Thursday 29 October 2015

DIY: DDL (Dulce De Leche)

From the time I started baking, I have heard about this DDL. I was always skeptical about making this as it involved using Pressure cooker. But I mustered some courage and made it, believe me, it was AWESOME. I literally had to hide it from mu hubby who was gulping it. Yeah it was that tasty.


Anyway, DDL is yum on its own, however I decided to make some Brownies with it. I will share the recipe in my next post.


But for now, lets make some DDL.


Ingredients

Condensed Milk - 1 Can (I used Milk Maid, Amu Mithai Mate also works fine)

Method

  • If the can contains any plastic lid remove them.
  • Fill half of the Pressure cooker with water and place the can in the water.
  • Don't place the can standing in the cooker, tilt the cans on its side so the can is fully immersed in water.
  • Close the lid and put the weight on, keep the stove on high flame.
  • After the 2st whistle reduce it to Low Flame, and leave it on low flame for 30-45 minutes.
  • After 30 minutes finish off the flame and allow it to cool on it own.
  • Once its completely cooled off open the tin and voila DDL is ready.
Note:If you are planning to use them later please store them in refrigerator. Seriously, if you want to use it later, don't taste it all or else you will finish everything and there ill be nothing left to store :-) It Happened with me couple of times. 

Monday 26 October 2015

Lunch Menu 25 - Jeera Pulav, Potato Fry and Mutter Paneer

A simple, quick and easy recipe to put together. It is so easy to prepare, however, it looks like you have put so much effort.


Click on the below links for recipes:

Monday 19 October 2015

Vegetable Biriyani (With Curd Marinade)

I am a huge of Biriyani and make it at least twice a week. I make it in multiple methodology, using different Vegetable as the Main dish etc. You can visit some Biriyani recipes I have posted here.

This is one of the lazy style of me making Biriyani. However, this is so Yummy. Do try this style.


Ingredients

Onion - 1 (Large, sliced)
Tomato - 1 (Small, Chopped)
Mint - 1/2 Cup (Chopped)
Rice - 1 Cup
Vegetables of your choice - 1 Cup (I used Cauliflower, Green Peas, French Beans and Potatoes)
Red Chilly Powder - 1 Teaspoon
Ginger Garlic Paste - 1 Teaspoon
Turmeric Powder - A generous Pinch
Garam Masala - 1/4 teaspoon
Bay Leaf - 1
Ghee (Clarified Butter) - 1Teaspoon (optional)
Curd/Yoghurt - 1 Cup (Thick)
Water - 1 Cup
Oil - 1 Tablespoon
Salt - To taste

Method


  • Wash and Soak rice in 1 cup of Water.
  • In a mixing bowl, place the curd and whip it using a Whisk and then all the following ingredients Tomato,Mint, Vegetables, Red Chilly powder, Ginger Garlic Powder, Turmeric Powder, Garam Masala and mix well.
  • Keep this aside till your rice soaks. I have sometimes covered it with a cling film and kept in refrigerator overnight and made Biriyani using it the next day and it works fine. 
  • In a pan, warm some oil then add Bay Leaf, Onion and Saute it.
  • Cook till the Onion becomes translucent and then add the prepared mixture soaked in yoghurt.
  • Reduce the flame and cook it for 5-7 minutes. Do stir it in between to avoid it from burning.
  • Meanwhile, switch on the rice in the electric Cooker. You can make it in regular vessel also.
  • Once the water in the Rice Cooker starts boiling, add the cooked mixture and salt into the rice cooker.
  • Give it a stir and put the lid back on and cook it till done.
  • Once the rice is done, add Ghee and stir it well and Serve.
  • If you are using a vessel, once you have cooked the Onion and yoghurt mixture for 5-7 minutes, add the water.
  • Once the water starts boiling, add rice and cover it with a lid and cook till done. 


Wednesday 14 October 2015

Paneer Pakora/Pakoda/Cottage Cheese Fritters 

I am a huge fan of paneer, I have lots of Paneer recipes in my blog, please check it here. I am sure all of us know how to make pakora/Fritters. The important part of this is to make a batter that gives yu tasty and crispy fritters.


Ingredients:

Paneer - 200 Gms
Besan/ChickPea Flour - 4 Tablespoon
Maida/APF - 1 Tablespoon
Rice Flour - 1 Tablespoon
Rava or Sooji or Cream of Wheat - 1 Tablespoon
Corn Flour - 1/2 Tablespoon
GInger Garlic Paste - 1/4 Teaspoon
Red Chilly Powder - 1/4 teaspoon
Garam Masala, Chat Masala, Asafoetida - A generous pinch of Each
Warm Oil - 1 Teaspoon
Oil - For Deep Frying
Water 1/4 Cup or as Required
Salt - To taste.

Method


  • Heat Oil in a Pan/kadhai. 
  • In a mixing bowl, place all the ingredients except Paneer, Oil and Water and whisk them together.
  • To this add 1 teaspoon of warm oil and add water little by little to get a thick Batter consistency.
  • Cut Paneer into cubes or strips.
  • By this time, Oil should be at right temperature for deep frying.
  • Test the oil by dropping a drop of batter, it should go down and then come up immediately. 
  • If the batter sits in the bottom it keeps the oil is hot and if the batter browns immediately then the temperature is hot.
  • Now that the oil, batter and Paneer is ready lets make some Hot Pakoras.
  • Take a Paneer cube dip it in the prepared batter, allow it to coat it all over.
  • Carefully drop this in the oil and fry it till gets a nice golden color.
  • Using a slotted spoon remove the Paneer pakora and place it a a kitchen napkin to remove excess oil.
  • Depending on the size of your kadai/pan you can drop 4-5 Paneer pakoras at a time.


Saturday 10 October 2015

Lunch Menu 24 - Rice with Chana Dal (Lentil) Fry, Beans Peanut Salad, Avarakkai Poriyal and Kollu Rasam

One more South Indian style Lunch Menu, I did not make Sambhar but made Dal Tadka to satisfy my North Indian Hubby :-).


Click on the below links for the Recipes:

  • Dal Tadka
  • Kollu Rasam
  • Avarakkai Poriyal (Broad Beans) (Will Update soon)
  • French beans Poriyal (Will Update soon)


Thursday 8 October 2015

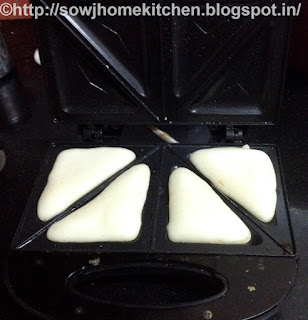
Super soft and Fluffy Cake in Sandwich Maker 

Who Says you need a Oven or Microwave to make a Cake!! All you need is a Sandwich Maker. Honestly  don't prefer using Pressure Cooker to make a cake as I find the process tiring and then the Cooker does not work well for other purposes. You may not be able to make complicated Cakes in the SW Maker however t will help you to satisfy your Cake Pangs.

Actually I find this method to be quicker as the Cake is ready in 2 minutes. You can take any simple recipe and make this. I used a Egg less Vanilla Cake Recipe. The cake recipes with eggs will come out much better for sure, however, due to the food choice of my family members I did not try it yet.


Ingredients

Maida or APF - 1 Cup
Sugar - 1/2 Cup
Curd- 1/2 Cup
Milk- /4 Cup
Cooking Oil - 1/2 Cup
Baking Powder - 1 Teaspoon
Vanilla Essence - 1 Teaspoon

Method

  • In a mixing bowl, add all ingredients except APF and Baking powder and whisk it well.
  • Sieve Baking Powder and APF together 2-3 times.
  • Now add the sieved Mixture to the ingredients in the mixing bowl and mix till they are all combined well.
  • Meanwhile, switch on the SW maker and once its ready, grease it with some oil and pour the prepared batter into the SW maker.
  • Close the SW maker and leave it for a minute or 2.
  • If required you can flip it and do the other side for like 30 seconds.
  • Enjoy Your Cake.


Note: The picture you see above is cooked for a minute on each side on the SW maker. The below picture in when I left it for more time (2-3 minute) to brown well.


I personally liked the 2nd One while my hubby liked the first one so cook it as per your wish. 


Sunday 4 October 2015

Kala Channa Pulav with Coconut Milk (Black ChickPeas - Coconut Milk Rice)

I had soaked some Black Chickpeas and made second 2nd Milk, so I decided to use them together. Believe you in me the End result was Yummy. Its So easy and is a One Pot Dish. 


Ingredients

Onion - 1 (Medium, Chopped)
Tomato Puree - Made from 1 Tomato (You can chop and add it too or skip this completely)
Red Chilly powder - 1 Teaspoon
Ginger Garlic Paste - 1/2 teaspoon
Garam Masala - 1/4 Teaspoon
Soaked Black Chickpeas - 1/4=1/2 Cup (Depending on your reference, I used 1/2 Cup)
Green Chilly - 1 Slit
Rice - 1 Cup (Washed and Soaked in 1/2 cup of water for 30 minutes)
Think Coconut Milk - 2 Cups 
Oil - 1 Tablespoon
Salt - To taste 

Ingredients
  • Heat some oil in a Pressure cooker, once the OIl is hot add some onions and fry them till they are translucent.
  • Then add the Tomato Puree and saute, add the Ginger Garlic paste. 
  • Cook till the Tomato is done and then add the Chilly Powder and Garam masala and saute.
  • Add the Black chickpeas to this and saute well.
  • Allow it to cook for 5 minutes till the masala is cooked well.
  • To this add the coconut milk, required Salt and soaked rice and cover it with a lid.
  • Cook it for 4 whistles and then switch off the flame and allow it to cool of its won.
Notes:
  • If you are using store bought Coconut Milk, add water and make it really thin.
  • I made coconut milk at home. Grate the coconut and add it to boiling water and set aside for 10 minutes. Then pass it through a muslin cloth and squeeze the milk and use. I used 1/2 medium coconut and 3 cups of water. I used 2 cups of coconut milk for this rice.
  • Take a tall vessel as the milk may spill.
  • It is easier to make in a electric rice cooker. Add the rice and coconut milk in the electric cooker. In a kadai,do the sauté of masala and onion and add it to the Rice coconut mixture in the cooker and cook. 
  • My rice usually takes 2.3 cups of water to get cooked so I have used 2 cups of coconut milk and 1/2 cup of water.
  • Depending on your ice, adjust the amount of liquid. 
  • You can add Mint leaves if your want.

Friday 2 October 2015

Carrot Ginger Soup 

Hello Everyone,

I know that I have been missing from action for some time now. There is one thing after another that is keeping me busy. My new work (Not new anymore, its been an Year now, time flies fast for sure), my brother's Marriage, My Dads' 60th Birthday celebration etc. Anyway, I hope that I am regular from now on.

During this period, lot of you wrote to me to check if everything was fine with me, thank you so much for your Love and Support. Thank you for visiting my page even though I did not post any recipe for couple of months,

Lets start with a simple, healthy and refreshing recipe today. I m sure by now, you would have figured out that I am not a great Soup Person, actually I LOVE THEM, its just that I don't make them. I usually buy hem from Restaurants or ready to Cook packs. This is one recipe I saw on TV and immediately decided to make as I had all ingredients in my kitchen.ALl the ingredients it needs is Carrot and Ginger, Yeah its that simple.


Ingredients

Carrots - 2 (Medium, Peeled and Chopped)
Onion - 1 (Small, Chopped)
Oil - 1 Teaspoon (I used Olive Oil)
Ginger - 1 Inch Piece ( Peeled and Grated)
Vegetable Stock - 3-4 Cups ( I used Homemade Stock, You can use Stock Tablets)
Pepper and Salt - To Taste

Method


  • Heat the oil in a pot, then add the onion and gnger and saute till the onion is done.
  • Then add the carrots and saute for around 2-3 minutes.
  • Add some salt and the stock and mix it well.
  • Cover it with a Lid and allow it t simmer for 20-30 minutes or till the Carrots are mushy.
  • Once it is done switch off the flame and allow it to cool down.
  • Blend the mixture in a Food Processor or blender.
  • Season it with some Pepper and Salt and Enjoy your Warm Soup.
Note: I usually prepare about 2 litres of Vegetable over the weekend and freeze it for  week and add them to my Gravies, Curries etc. I will write a post on Making and storing them soon!.